

Showing posts with label DIY. Show all posts
Showing posts with label DIY. Show all posts
Wednesday, April 8, 2015

Friday, April 3, 2015
EASTER EGG DYE: USING SPICES FROM YOUR KITCHEN

One night last week (yes, at 10pm), I decided to dye some eggs for the Easter season. Although it was still snowing and 30 degrees outside, I was determined. I pulled out a carton of eggs and some spices, and I was more than excited with my beautiful outcome. And more-so than the gorgeous hues of reds, yellows, and lavenders, I was proud that my creativity in making an all-natural dye actually worked (I have my fair share of trial and error!). Here's what I did...!

Tuesday, September 10, 2013
EASY ARM CHAIR REDO
I found a couple ugly chairs on craigslist for $35 a pair. They looked like worn out office waiting room chairs. I needed a clean lined (EASY to upholster) chair to sit in the corner of our bedroom. This chair wasn't meant to be crazy or fabulous - just a space filler that matched our colors.


Our bedroom theme is primary blues - sprinkled with other jewel tone pieces (think royal relaxation ;) ). So I decided to have my hubby redo this chair in dark purple velvet fabric.
The part that sucks the most about these projects is how long is takes to remove the BILLION staples.
I DEFINITELY married a hottie - and don't worry (although we spend almost every non-working minute together), I will never take this sight for granted!
He removed the fabric, I traced the pieces onto new fabric, cut them out, and he re-stapled. All in an evenings work!
Pretty functional, right? I'm thinking I want to sand down and paint the wood a lighter color -
We are (but really, just I am) currently working on a chair that Ben says "it looks like Monsters Inc swallowed that chair". I think I'll finish one of the two and post it... I swear it's not blue, but there may be some validity to his statement!
Wednesday, June 26, 2013
Kitchen Table Lighting Redo
I love Craigslist - now, I know all kinds of creepy stuff happens with Craigslist, but that is what husbands are for my sweet husband always offers to team up on all my awesome finds! He has driven all over the Houston area and surrounding cities picking up little treasures for me. I definitely don't recommend going alone, no matter how good the deal is (I often have to remind myself of this!).
SO...there was a HORRIBLE dated light fixture in our breakfast area in the kitchen - this picture actually makes it look almost decent, but trust me, it wasn't. Bright gold (circa 1980s, it's a given) with flat glass panes.

I want to do a chandelier for the kitchen lighting (oh so glamorous - but I will probably need Ben's approval :) ), so I needed to find a piece that could compliment it. Hmmm where could I find inspiration that incorporates chandeliers and the rustic them I am going for...? Ya, ya, ya, I know - Restoration Hardware obsessed. So of course we are on a budget, so I scoured Craigslist for something I could revamp. i forgot to take a before picture because I was so excited I had the spray paint can ready for action as soon as Ben brought the light home! $30... boom!
It was a 5 pendant light (see below pic), and it was a bright shiny brushed nickel. It also had some frosted glass coverings that looked a bit "commercial"... but not in the good way.
We unscrewed all of the frosted glass coverings from each of the pendants, and I spray painted it dark brown and let it dry. I then went back with black acrylic paint and a wide paint brush and dry brushed the black over the chocolate brown so it has a dark distressed look . I wanted the metal for both this fixture and the chandelier to match, so I figured painting by hand would best achieve this effect.
This is my inspiration and then my final outcome (please, everyone, pretend like you do not see the vertical blinds... I haven't gotten around to changing the window treatments :)).

I can't wait to show the whole table with the light above! We have been building away, and our table is freaking awesome!!
SO...there was a HORRIBLE dated light fixture in our breakfast area in the kitchen - this picture actually makes it look almost decent, but trust me, it wasn't. Bright gold (circa 1980s, it's a given) with flat glass panes.

I want to do a chandelier for the kitchen lighting (oh so glamorous - but I will probably need Ben's approval :) ), so I needed to find a piece that could compliment it. Hmmm where could I find inspiration that incorporates chandeliers and the rustic them I am going for...? Ya, ya, ya, I know - Restoration Hardware obsessed. So of course we are on a budget, so I scoured Craigslist for something I could revamp. i forgot to take a before picture because I was so excited I had the spray paint can ready for action as soon as Ben brought the light home! $30... boom!
It was a 5 pendant light (see below pic), and it was a bright shiny brushed nickel. It also had some frosted glass coverings that looked a bit "commercial"... but not in the good way.
We unscrewed all of the frosted glass coverings from each of the pendants, and I spray painted it dark brown and let it dry. I then went back with black acrylic paint and a wide paint brush and dry brushed the black over the chocolate brown so it has a dark distressed look . I wanted the metal for both this fixture and the chandelier to match, so I figured painting by hand would best achieve this effect.
This is my inspiration and then my final outcome (please, everyone, pretend like you do not see the vertical blinds... I haven't gotten around to changing the window treatments :)).

I can't wait to show the whole table with the light above! We have been building away, and our table is freaking awesome!!
Sunday, May 19, 2013
Painted Book Success!
I posted my craft idea the other day - to make matching shiny gold/copper book sets. We have a lot of shelves to fill, but this is a good start!

Wednesday, April 17, 2013

Thursday, February 28, 2013
Recycled Mirrors
This was one of our first décor projects once we moved in.
We moved in and all of a sudden had no furniture or stuff for our walls! We have
2 HUGE walls in our living room, so technically I needed to come up with 2 very
large “arrangements” or pictures for them. I looked all over for something big
enough – I needed something that wouldn’t look dinky on 22’ long walls…
tough to do on a tight budget.
I started looking around the house for things to use – I was
determined that we would use, reuse, and recycle as much of the house as
possible. I viewed it as a challenge to see how I could update an old house
with minimal new things (and $$). For these mirrors we purchased 8 boards at $1.86 per board. We also purchased the glue for just a couple bucks - 2 large leaning mirrors for less than $20..!
Our master bathroom has a million mirrors – two of which
were hanging on the doors that lead into the closet. In efforts to open up the
bathroom to seem less segmented I wanted all doors taken down. So, I decided to
reuse the two matching mirrored doors and turn them into leaning wall mirrors
in the living room.


Ta-Da! I’m pumped! This was the perfect solution. I love
finding outdated aspects of our house and reusing them to update – the ultimate
recycling!
If you don’t have mirrors, people are always selling or
giving them away on Craigslist – apparently larger mirrors everywhere used to
be “in” and everyone renovating their homes now are tearing them all out. Their
outdated becomes our updated!!
How We Did It!
How We Did It!
Friday, February 8, 2013
Coffee Table Ottoman
Yes, we have a cow – well kind of. I have always wanted a high end cowhide rug - so for my birthday, Ben got one for me (before anyone freaks out, we found it on Craigslist.. :) ). Well, our cow is black… and the table was mahogany… you get the picture.
Here were my inspirations for this project:


The table top was able to screw off, so we took the table
apart. I chalk painted the base of the table a cream color to contrast the cow
and compliment the worn leather couches.

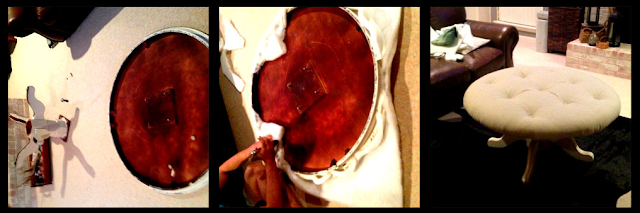


We love it… I had a girlfriend over last weekend (just a day after we finished) who complimented our ottoman and asked where we got it…a la Bacon! *sigh... with a smile and relief... that we actually pulled it off* (!!!)
How We Did It!
Subscribe to:
Posts
(
Atom
)